
How to Clean Your Camper Water Tank: A Comprehensive Guide for Safe and Fresh Water
The open road beckons, promising adventure and the freedom of the open spaces. For many, that adventure is best experienced from the comfort of a camper. However, the joy of camping hinges on one crucial element: clean water. Your camper water tank is the lifeline to hydration, cooking, and hygiene while you’re away from home. Neglecting its maintenance can lead to unpleasant tastes, odors, and even health hazards. This comprehensive guide explains how to clean camper water tank effectively, ensuring your travels are always accompanied by safe and refreshing water.
Why Cleaning Your Camper Water Tank is Essential
The importance of a clean camper water tank cannot be overstated. Over time, bacteria, algae, and sediment can accumulate within the tank. These contaminants can cause a variety of issues, including:
- Unpleasant Taste and Odor: Stagnant water breeds bacteria that can make your drinking water taste and smell foul, ruining your enjoyment of meals and beverages.
- Health Risks: Certain bacteria, such as Legionella, can thrive in water tanks and cause serious illness. Regular cleaning minimizes these risks.
- Clogging and Damage: Sediment and debris can clog your water lines, pumps, and faucets, leading to costly repairs and inconvenience.
- Reduced Water Quality: Even if not immediately harmful, contaminated water will affect the taste and clarity of your water, making it less enjoyable.
Regularly cleaning your camper water tank is a proactive measure that protects your health, extends the lifespan of your water system, and enhances your overall camping experience. The frequency of cleaning depends on your usage, water source, and the environment where you camp. A good rule of thumb is to clean the tank at least twice a year, or more frequently if you use your camper extensively or camp in areas with questionable water quality. Understanding how to clean camper water tank is an essential part of camper ownership.
Gathering Your Supplies: What You’ll Need
Before you begin the cleaning process, gather the necessary supplies. Having everything ready will streamline the process and ensure you complete the job efficiently. Here’s a list of essential items:
- Potable Water: You’ll need a source of clean, drinkable water to rinse the tank after cleaning.
- Cleaning Solution: The most common and effective cleaning solution is a bleach solution. Use unscented household bleach (sodium hypochlorite) that contains no additives. Alternatively, you can use a commercial water tank cleaner specifically designed for campers.
- Measuring Cups and Spoons: Accurate measurements are crucial for preparing the cleaning solution.
- Gloves and Eye Protection: Protect your skin and eyes from the bleach solution.
- Hoses: You’ll need a hose to fill the tank and another to drain it. Ensure your hoses are designated for potable water use.
- Bucket: Useful for mixing the cleaning solution and for rinsing.
- Scrub Brush (Optional): A long-handled brush can help remove stubborn debris from the tank walls. Ensure the brush is clean and suitable for use with potable water.
- Drain Pan or Container: To catch any spills or drips during the draining process.
- Wrench (Optional): May be needed to access the drain plug, depending on your camper’s setup.
Having these items readily available will make understanding how to clean camper water tank much easier.
Step-by-Step Guide: Cleaning Your Camper Water Tank
Now, let’s delve into the step-by-step process of cleaning your camper water tank. This process involves several crucial steps to ensure a thorough and effective cleaning.
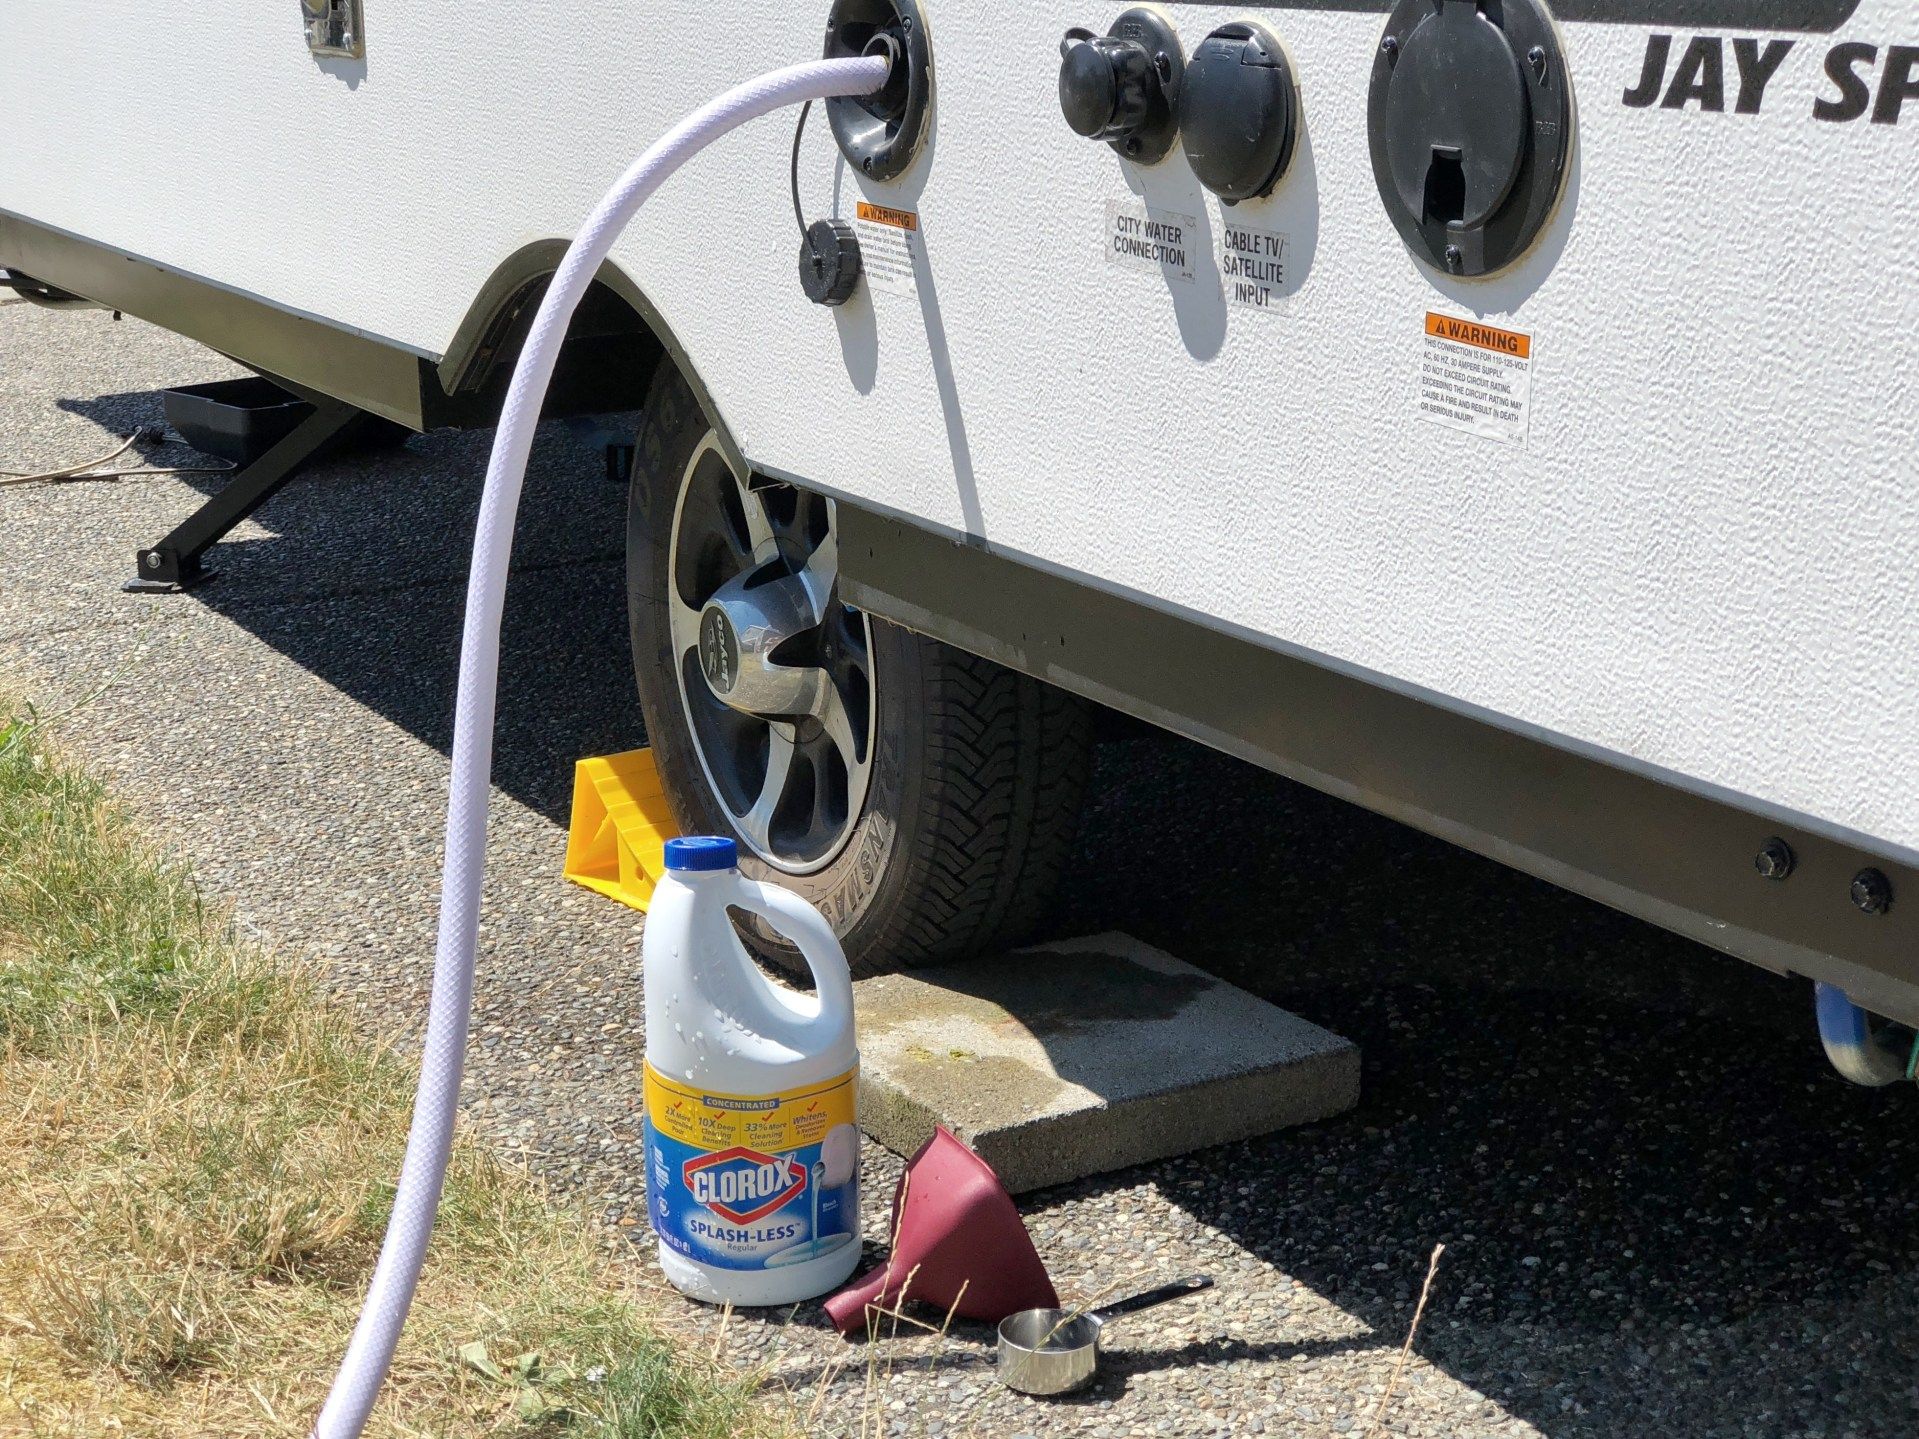
Step 1: Prepare the Bleach Solution
The most common method involves using a bleach solution. The concentration of bleach required depends on the size of your water tank. Generally, a solution of 1/4 cup of unscented household bleach per 15 gallons of water is recommended. However, always consult your camper’s manual for specific recommendations.
To prepare the solution, first, measure the correct amount of bleach using a measuring cup. Next, fill a bucket with a small amount of water and add the bleach. Mix the solution thoroughly. This pre-mixing ensures the bleach is evenly distributed when it enters the camper water tank.
Step 2: Fill the Water Tank
Using a potable water hose, fill your camper water tank with the bleach solution. Ensure the tank is completely full, or as close to full as possible. This allows the solution to reach all surfaces within the tank.
Step 3: Circulate the Solution
Once the tank is full, turn on your water pump to circulate the bleach solution throughout your camper’s water system. Open all faucets (hot and cold) and let the water run until you smell bleach. This ensures that the solution reaches all the pipes, fixtures, and the hot water heater. Turn off the pump and let the solution sit for at least 4 hours, or preferably overnight, to allow the bleach to effectively kill bacteria and remove any buildup. If your tank is heavily soiled, you may want to use a longer soaking time or repeat the cleaning process.
Step 4: Drain the Tank
After the soaking period, drain the bleach solution from your camper water tank. Locate the drain plug, typically located at the bottom of the tank, and remove it. Allow the tank to drain completely. You may need to use a wrench to remove the drain plug if it’s difficult to access. Be sure to drain the water into a suitable area that won’t harm the environment.
Step 5: Rinse the Tank
Once the tank is empty, refill it with fresh, potable water. Repeat the process of circulating the water through your entire water system, opening each faucet until the water runs clear and no longer smells of bleach. Drain the tank completely again. Repeat this rinsing process at least twice, or until you are confident that all traces of bleach have been removed. Proper rinsing is essential to avoid leaving any bleach residue in your system.
Step 6: Inspect and Test
After rinsing, inspect the tank for any remaining debris or discoloration. If necessary, repeat the cleaning process. You can also test the water for chlorine using a pool testing kit or a test strip. This will verify that the bleach has been adequately removed. If you are satisfied with the cleanliness, you can refill the tank with fresh water and enjoy your camping adventure.
By following these steps, you’ll effectively address how to clean camper water tank.
Alternative Cleaning Methods
While a bleach solution is the most common and effective method, other options are available for cleaning your camper water tank:
- Commercial Water Tank Cleaners: These products are specifically designed for camper water tanks and often contain different cleaning agents. Follow the manufacturer’s instructions carefully when using these products.
- Vinegar Solution: A vinegar solution (1 cup of white vinegar per 10 gallons of water) can be used as a gentler cleaning alternative. However, vinegar may not be as effective as bleach against certain types of bacteria.
- Baking Soda Solution: Baking soda can help to remove odors and mild stains. Mix a small amount of baking soda with water and use it in a similar manner to bleach.
When choosing an alternative cleaning method, consider the severity of the contamination and the type of contaminants you suspect are present. Always research the product and follow its instructions carefully. Remember, regular cleaning is key, no matter which method you choose.
Troubleshooting Common Issues
Even with diligent cleaning, you might encounter certain issues. Here are some common problems and their solutions:
- Persistent Odors: If odors persist after cleaning, it could indicate a problem with your water lines or water heater. Consider sanitizing these components as well.
- Discoloration: Discoloration in the water might suggest the presence of algae or rust. Repeat the cleaning process and consider installing a water filter.
- Slow Water Flow: Clogged water lines can cause slow water flow. Check your water filter and aerators for any blockages.
- Taste Issues: If the water still tastes unpleasant, consider using a water filter specifically designed for campers.
If you continue to experience problems, consult a professional RV technician. They can diagnose and resolve more complex issues, ensuring your water system is in optimal condition. Understanding how to clean camper water tank also means knowing how to identify and solve potential problems.
Maintaining a Clean Camper Water Tank: Prevention is Key
While knowing how to clean camper water tank is important, preventing contamination in the first place is even better. Here are some tips for maintaining a clean water tank:
- Use a Water Filter: Install a water filter at the inlet of your water tank to remove sediment, debris, and some contaminants before they enter the tank.
- Use Potable Water: Always fill your tank with potable water from a reliable source. Avoid using water from questionable sources like lakes or rivers.
- Drain the Tank Regularly: Drain the tank completely if you are not using your camper for an extended period. This prevents the stagnation of water and the growth of bacteria.
- Sanitize Regularly: Clean your tank at least twice a year, or more frequently if you camp frequently or use your camper in areas with potentially contaminated water.
- Inspect Regularly: Inspect your tank and water system regularly for leaks, cracks, or other signs of damage.
By following these tips, you can minimize the need for frequent cleaning and ensure your water tank remains clean and safe.
Conclusion: The Importance of a Clean Camper Water Tank
Maintaining a clean camper water tank is crucial for the health and enjoyment of your camping trips. By following the steps outlined in this guide, you can effectively clean and sanitize your water tank, ensuring a supply of fresh, safe water. Remember to gather the necessary supplies, prepare the cleaning solution carefully, and follow the step-by-step instructions for cleaning, draining, and rinsing. Consider preventative measures, such as using a water filter and draining the tank regularly, to minimize the need for frequent cleaning.
Investing the time and effort to clean your camper water tank is an investment in your health and well-being. It also extends the lifespan of your water system and enhances your overall camping experience. Now that you understand how to clean camper water tank, you can confidently enjoy your adventures, knowing you have a reliable source of clean, fresh water at your fingertips.
[See also: How to Winterize Your Camper Water System]
[See also: Camper Water System Troubleshooting Guide]
[See also: Best Water Filters for Campers]

