Brewing Success: A Comprehensive Guide on How to Program a Black and Decker Coffee Pot
The aroma of freshly brewed coffee is a morning ritual for many. For those who crave the convenience of waking up to a ready-made pot, the programmable coffee maker is a modern marvel. Among the leading brands in this arena, Black and Decker has consistently offered reliable and user-friendly models. This article serves as a comprehensive guide on how to program a Black and Decker coffee pot, ensuring you can effortlessly enjoy a perfect cup at your desired time. We’ll cover the basics, troubleshoot common issues, and offer tips to maximize your coffee brewing experience.
Understanding Your Black and Decker Coffee Pot
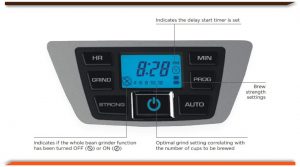
Before diving into the programming process, it’s crucial to familiarize yourself with the specific model you own. Black and Decker offers a wide range of coffee makers, each with its own nuances. However, the core functionality of programming a Black and Decker coffee pot remains relatively consistent across most models. Locate the control panel on your coffee maker. This panel typically houses the buttons or touch screen interface used for programming, setting the clock, and initiating the brewing process. Common buttons you’ll likely encounter include:
- Clock/Set Time: Used to set the current time.
- Program/Brew Later: The primary button for programming the brewing time.
- Hour/Minute: Buttons or controls used to adjust the brewing time.
- On/Off/Brew: The button used to start the brewing process (or turn the machine on).
Consulting your coffee maker’s user manual is always recommended. The manual provides model-specific instructions and may include features unique to your appliance. However, the general steps outlined below should apply to most Black and Decker coffee pot models.
Step-by-Step Guide: Programming Your Black and Decker Coffee Pot
Programming your Black and Decker coffee pot is a straightforward process, typically involving these steps:
- Set the Current Time: Ensure the clock on your coffee maker displays the accurate current time. Press the “Clock” or “Set Time” button. Use the “Hour” and “Minute” buttons to adjust the time. Confirm your selection by pressing the “Clock” button again or another designated confirmation button.
- Set the Brewing Time: Press the “Program” or “Brew Later” button. The display will likely show the current programmed time (if any). Use the “Hour” and “Minute” buttons to set the desired brewing time. Consider when you want your coffee to be ready, and set the time accordingly. For instance, if you want your coffee ready at 7:00 AM, program the coffee maker for that time.
- Confirm Your Selection: Once you’ve set the desired brewing time, confirm your selection. This often involves pressing the “Program” button again or another designated confirmation button. Some models may have an indicator light or display that confirms the programming is active.
- Prepare Your Coffee Maker: Before programming, ensure your coffee maker is properly prepared. This includes filling the water reservoir with the appropriate amount of water, adding the desired amount of ground coffee to the filter, and ensuring the carafe is in place.
- Brew: After programming, the coffee maker will automatically begin brewing at the set time. Enjoy your fresh coffee!
Troubleshooting Common Issues with Your Black and Decker Coffee Pot
Even with straightforward instructions, you may encounter some issues when programming your Black and Decker coffee pot. Here are some common problems and their solutions:
- Coffee Maker Not Brewing at the Programmed Time:
- Check the Clock: Ensure the clock is set to the correct time.
- Verify Programming: Double-check that the brewing time is accurately programmed.
- Power Supply: Confirm the coffee maker is plugged in and receiving power.
- Carafe Position: Make sure the carafe is properly placed on the warming plate. The coffee maker may not brew if the carafe isn’t correctly positioned.
- Display Issues:
- Dim Display: If the display is dim or unreadable, check the power supply and consider replacing the batteries if applicable.
- Error Messages: Consult the user manual for specific error messages and troubleshooting steps.
- Coffee Not Brewing at All:
- Water Level: Ensure there is sufficient water in the reservoir.
- Ground Coffee: Check that the ground coffee is correctly placed in the filter.
- Clogged Filter: Clean the filter basket to prevent clogging.
Tips for a Better Coffee Brewing Experience
Beyond the basics of programming, consider these tips for an improved coffee experience with your Black and Decker coffee pot:
- Use Fresh, Quality Coffee Beans: The quality of your coffee beans significantly impacts the taste of your brew. Use freshly roasted and ground beans for the best flavor.
- Use Filtered Water: Filtered water can enhance the taste of your coffee by removing impurities.
- Clean Your Coffee Maker Regularly: Regular cleaning prevents mineral buildup and ensures optimal brewing performance. Descale your coffee maker every few months.
- Experiment with Coffee-to-Water Ratio: Adjust the amount of coffee grounds to water to achieve your preferred strength. Experiment with different ratios to find your perfect cup.
- Preheat Your Carafe: Preheating the carafe with hot water before brewing can help maintain the coffee’s temperature.
Maintaining Your Black and Decker Coffee Pot
Proper maintenance is crucial for the longevity and performance of your Black and Decker coffee pot. Regular cleaning and descaling are essential practices. Here’s how to keep your coffee maker in top condition:
- Cleaning: After each use, discard the used coffee grounds and rinse the filter basket. Wash the carafe, lid, and any removable parts with warm, soapy water.
- Descaling: Over time, mineral deposits from water can build up inside your coffee maker, affecting its performance. Descale your coffee maker every 1-3 months, depending on how frequently you use it and the hardness of your water. Use a descaling solution (available at most stores that sell coffee makers) or a mixture of equal parts white vinegar and water. Follow the manufacturer’s instructions for the descaling process.
- Regular Inspection: Periodically inspect the coffee maker for any signs of wear or damage. Check the power cord, the heating element, and the water reservoir.
Advanced Features and Considerations
While the primary focus is on how to program a Black and Decker coffee pot, some models may include advanced features such as:
- Strength Selection: Some coffee makers offer settings to adjust the coffee’s strength, allowing you to brew a bolder or milder cup.
- Automatic Shut-Off: Many models have an automatic shut-off feature for safety and energy efficiency.
- Pause and Serve: This feature allows you to pour a cup of coffee mid-brew.
Familiarize yourself with these features if they are available on your model to maximize your coffee brewing experience. Always consult your user manual for specific details on these features.
Conclusion: Brewing the Perfect Cup with Your Black and Decker Coffee Pot
Programming your Black and Decker coffee pot is a simple process that can significantly enhance your morning routine. By following the steps outlined in this guide, troubleshooting common issues, and implementing maintenance practices, you can enjoy a consistently delicious and convenient cup of coffee. Remember to consult your user manual for model-specific instructions and explore any advanced features your coffee maker may offer. With a little practice and care, you’ll be brewing the perfect cup of coffee every time.
From setting the clock to programming the brew time, the process is designed for ease of use. If you’re looking for additional information, consider [See also: How to Clean Your Coffee Maker] or [See also: Best Coffee Beans for Programmable Coffee Makers] to further enhance your experience. Enjoy your coffee!

