Brewing Perfection: A Comprehensive Guide on How to Start a Keurig Coffee Machine
The aroma of freshly brewed coffee is a morning ritual for millions. For many, the Keurig coffee machine has become synonymous with convenience and speed, offering a quick and easy way to enjoy a cup of joe. But for those new to the Keurig experience, the initial setup and operation can seem a bit daunting. This comprehensive guide will walk you through how to start a Keurig coffee machine, ensuring you can brew your perfect cup with ease and confidence.
Unboxing and Initial Setup
The journey to a perfect cup begins even before you brew. Unboxing your new Keurig is the first step. Carefully remove all components from the box, checking against the included parts list to ensure everything is present. Common components include the coffee maker itself, a drip tray, a water reservoir, and sometimes a filter. Some models may include a starter pack of K-Cup pods.
Once unpacked, the initial setup involves these steps:
- Rinsing the Water Reservoir: Before anything else, rinse the water reservoir thoroughly with fresh water. This removes any manufacturing residue and prepares it for use.
- Inserting the Water Filter (if applicable): Many Keurig models include a water filter to improve the taste of your coffee and extend the life of the machine. If your model has one, insert the filter into the designated area within the water reservoir according to the manufacturer’s instructions.
- Filling the Water Reservoir: Fill the water reservoir with fresh, filtered water. The fill line is usually clearly marked on the reservoir itself. Ensure you don’t overfill.
- Powering On: Plug the coffee maker into a grounded electrical outlet. Press the power button, which is usually located on the top or side of the machine. The machine will typically light up, indicating it’s ready to use.
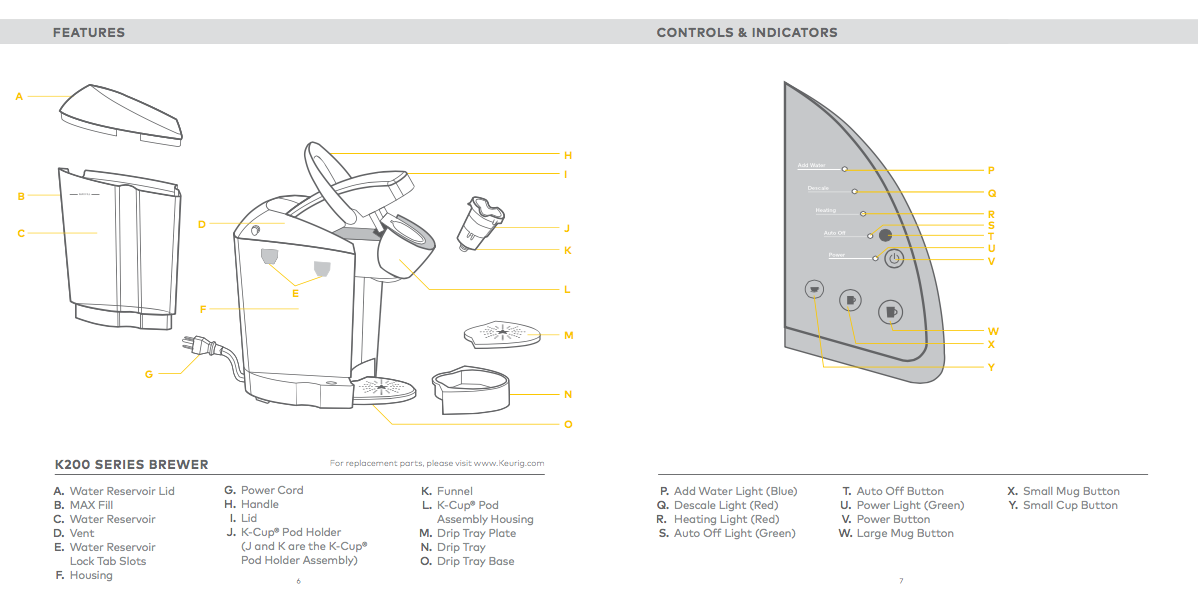
Understanding the Keurig’s Components
Before we delve into the brewing process, it’s helpful to understand the key components of your Keurig machine. Familiarity with these parts will streamline your experience and help you troubleshoot any issues that may arise.
- Water Reservoir: This holds the water used for brewing. The size varies depending on the Keurig model.
- K-Cup Holder (or Pod Holder): This is where you insert the K-Cup pod. It’s designed to pierce the top and bottom of the pod, allowing water to flow through and extract the coffee.
- Drip Tray: This tray catches any drips or spills, keeping your countertop clean. It’s often removable for easy cleaning.
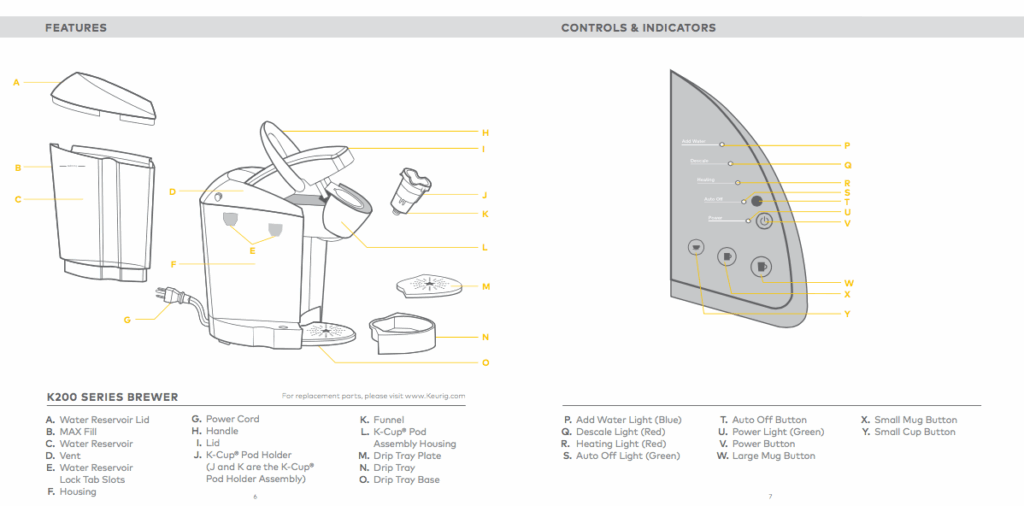
- Control Panel: This panel features buttons and displays that allow you to control the brewing process, such as selecting cup size and initiating brewing.
- Power Button: Turns the machine on and off.
The Brewing Process: Step-by-Step Guide
Now, let’s get to the heart of the matter: how to start a Keurig coffee machine and brew your first cup. Following these steps will ensure a successful and enjoyable brewing experience.
- Power On and Heat Up: Ensure your Keurig is plugged in and powered on. The machine will usually take a few minutes to heat up. The indicator light will typically stop blinking and remain solid when the machine is ready.
- Lift the Handle: Locate the handle on top of the machine. Lift the handle to open the K-Cup holder.
- Insert the K-Cup Pod: Place your chosen K-Cup pod into the K-Cup holder. Ensure the lid is properly sealed.
- Close the Handle: Lower the handle to close the K-Cup holder. This action pierces the K-Cup pod.
- Choose Your Cup Size: Select your desired cup size on the control panel. Keurig machines typically offer multiple size options, such as 6, 8, or 10 ounces.
- Position Your Mug: Place your mug on the drip tray, ensuring it’s centered under the coffee dispenser.
- Start Brewing: Press the brew button. The machine will pump hot water through the K-Cup pod, extracting the coffee and dispensing it into your mug.
- Enjoy Your Coffee: Once the brewing process is complete, carefully remove your mug and enjoy your freshly brewed cup of coffee.
Troubleshooting Common Issues
Even with its user-friendly design, you might encounter some issues when using your Keurig. Here are some common problems and their solutions:
- Machine Not Brewing: Check if the water reservoir has enough water. Ensure the machine is powered on and has heated up. Check for any clogs in the needle that pierces the K-Cup pod.
- Weak Coffee: If your coffee is weak, try using a smaller cup size or switching to a stronger K-Cup pod.
- Machine Leaking: Check the water reservoir for cracks or leaks. Ensure the K-Cup holder is properly closed.
- Error Messages: Consult your Keurig’s manual for specific error messages and their corresponding solutions.
- Descaling: Over time, mineral buildup can affect your machine’s performance. Regularly descale your Keurig (usually every 3-6 months) using a descaling solution or a mixture of water and vinegar. Refer to your Keurig’s manual for specific instructions on how to descale.
Cleaning and Maintenance for Optimal Performance
Regular cleaning and maintenance are essential for keeping your Keurig running smoothly and prolonging its lifespan. Here’s a maintenance schedule:
- Daily: Rinse the drip tray and K-Cup holder. Wipe down the exterior of the machine.
- Weekly: Clean the K-Cup holder thoroughly, removing any coffee grounds.
- Monthly: Clean the needles that pierce the K-Cup pod to remove any coffee grounds that might accumulate.
- Every 3-6 Months: Descale your Keurig to remove mineral buildup.
Maximizing Your Keurig Experience
Beyond the basics of how to start a Keurig coffee machine, there are several ways to enhance your Keurig experience.
- Experiment with K-Cup Pods: Explore the wide variety of K-Cup pods available, including different coffee blends, teas, and hot chocolate.
- Use a Reusable K-Cup Filter: For more flexibility and to reduce waste, consider using a reusable K-Cup filter. You can fill it with your favorite ground coffee.
- Customize Your Brew: Some Keurig models offer settings to adjust brew strength and temperature. Experiment with these settings to find your perfect cup.
- Consider a Water Filter: Using a water filter can significantly improve the taste of your coffee and extend the life of your machine.
The Keurig coffee machine has revolutionized the way many people enjoy coffee. By understanding the basic steps of how to start a Keurig coffee machine, along with proper maintenance and a little experimentation, you can unlock the full potential of your Keurig and savor a delicious cup of coffee every time. Whether you’re a seasoned coffee aficionado or a casual drinker, the Keurig offers a convenient and customizable brewing experience. [See also: How to Clean a Keurig Coffee Maker] [See also: Best Keurig Coffee Pods for 2024] [See also: Keurig Coffee Maker Troubleshooting Guide]
Mastering how to start a Keurig coffee machine is the first step in a journey of coffee exploration. Enjoy the process of discovery and the delicious results!

