
From Empty Frame to Adventure Mobile: A Comprehensive Guide on How to Build a Camper on a Trailer Frame
The allure of the open road, the freedom to roam, and the comfort of home—all in one package. For many, this dream translates into building their own camper. And at the heart of this DIY project lies a crucial component: the trailer frame. This guide will walk you through the essential steps on how to build a camper on a trailer frame, transforming a utilitarian base into a personalized adventure haven. Whether you’re a seasoned DIY enthusiast or a newcomer eager to embark on this rewarding journey, this comprehensive guide will equip you with the knowledge and confidence to succeed.
Building a camper on a trailer frame offers unparalleled customization. You’re not constrained by pre-existing designs or limited by factory options. Instead, you have complete control over the layout, materials, and features, tailoring the camper to your specific needs and preferences. This guide will delve into every aspect of this exciting project, from selecting the right trailer frame to the finishing touches that make your camper feel like home. We will explore the critical considerations, potential pitfalls, and practical tips that will help you navigate the process successfully.
Planning and Preparation: Laying the Foundation
Before you even touch a wrench, thorough planning is paramount. This initial phase sets the stage for a smooth and successful build. Failure to plan adequately can lead to costly mistakes, wasted materials, and a frustrating experience. So, let’s begin with the essentials.
Defining Your Needs and Desires
What kind of adventures do you envision? Are you planning weekend getaways or extended cross-country trips? Do you prioritize sleeping space, cooking facilities, or storage capacity? Consider the following:
- Travel Style: How will you primarily use the camper? (e.g., solo travel, couple, family)
- Occupancy: How many people will regularly use the camper?
- Climate and Seasonality: What weather conditions will you encounter? (e.g., extreme heat, cold, rain)
- Required Amenities: What are your must-haves? (e.g., bed, kitchen, bathroom, seating)
- Budget: How much are you willing to spend on the entire project?
Answering these questions will help you determine the size, layout, and features of your camper, which in turn influences your trailer frame selection.
Choosing the Right Trailer Frame
The trailer frame is the backbone of your camper. Selecting the right one is crucial for structural integrity, safety, and ease of construction. Here’s what to consider:
- Weight Capacity: Determine the total weight of your camper, including the frame, shell, interior components, water, and gear. Choose a frame with a weight capacity that exceeds this by a comfortable margin (at least 20%).
- Size and Dimensions: Match the frame’s length and width to the desired size of your camper. Consider the overall footprint and how it will fit into your intended storage space.
- Frame Type: Common types include:
- Steel: Durable and strong, but heavier and susceptible to rust.
- Aluminum: Lighter and rust-resistant, but generally more expensive.
- Prefabricated: Ready-made frames that are convenient but may limit customization.
- DIY: Building your own frame from scratch offers maximum flexibility but requires welding skills and expertise.
- Axle Type and Suspension: Choose axles and suspension systems appropriate for the expected weight and terrain. Torsion axles offer a smoother ride than leaf springs, but leaf springs are more robust.
- Braking System: Ensure the frame is compatible with your chosen braking system (e.g., electric brakes).
Pro Tip: Research reputable trailer frame manufacturers and read reviews before making your selection. Consider buying a used frame to save money, but inspect it carefully for any signs of damage or wear.
Gathering Tools and Materials
Once you have a plan and a trailer frame, it’s time to gather the necessary tools and materials. The specific requirements will vary depending on your design, but here’s a general list:
- Tools:
- Welder (if building your own frame or making modifications)
- Angle grinder
- Drill and drill bits
- Saw (circular saw, jigsaw, or reciprocating saw)
- Measuring tape
- Level
- Clamps
- Screwdrivers and wrenches
- Safety gear (safety glasses, gloves, respirator)
- Materials:
- Lumber for framing (e.g., 2x4s, 2x6s)
- Sheathing (e.g., plywood, OSB)
- Insulation
- Exterior siding
- Roofing materials
- Fasteners (screws, nails, bolts)
- Wiring and electrical components
- Plumbing components (if adding a bathroom or kitchen)
- Interior finishes (e.g., flooring, wall coverings, cabinetry)
Building the Camper Structure: From Frame to Shell
With the planning phase complete and the trailer frame in place, it’s time to start building the camper’s structure. This involves framing the walls, floor, and roof, and then sheathing the exterior. Careful attention to detail and precise measurements are crucial at this stage.
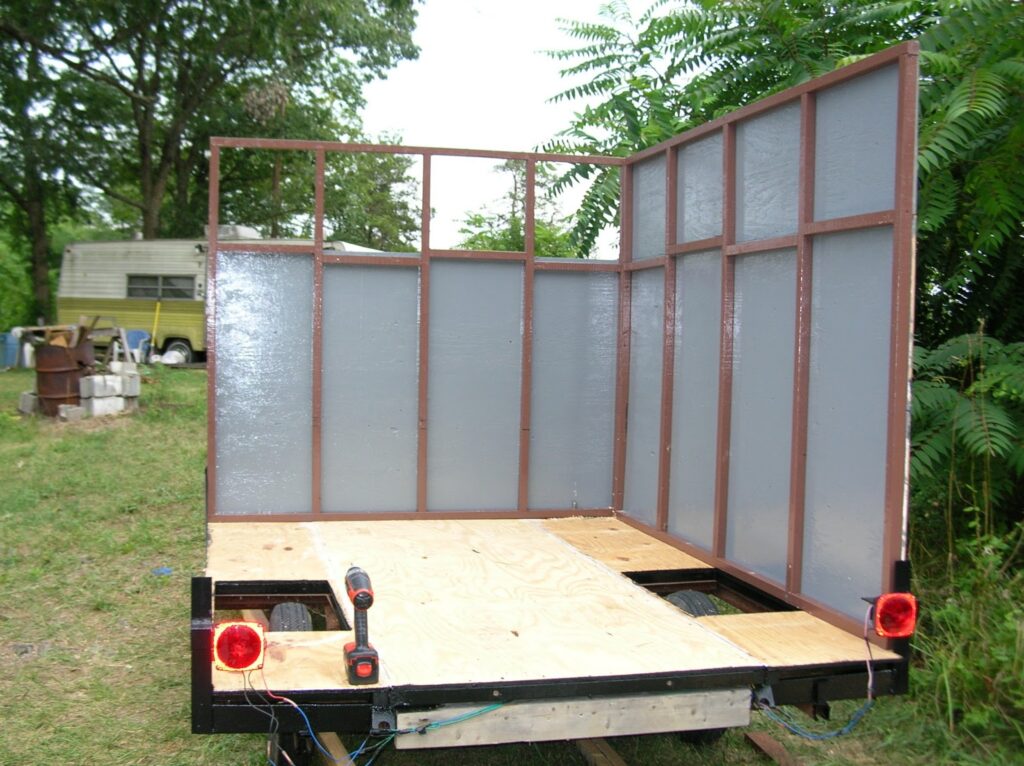
Framing the Walls, Floor, and Roof
The framing provides the structural support for the camper. It’s typically constructed from lumber, such as 2x4s or 2x6s. The framing method will depend on your design, but the general steps are as follows:
- Floor Framing: Build a frame on top of the trailer frame, ensuring it’s level and square. Attach the frame securely to the trailer frame.
- Wall Framing: Construct the wall studs, headers, and sills. Consider door and window openings during this stage.
- Roof Framing: Create the roof rafters or trusses, depending on your roof design. Ensure proper support and overhang.
- Assembly: Assemble the wall frames onto the floor frame, then attach the roof frame. Ensure all connections are secure.
Pro Tip: Use construction adhesive in addition to screws or nails for stronger joints. Consider prefabricating wall sections in a workshop before assembling them on the trailer frame to save time and improve accuracy.
Sheathing the Exterior
Sheathing the exterior creates a weather-resistant barrier and provides a surface for the siding. Common sheathing materials include plywood and OSB (oriented strand board). The process involves:
- Cutting and Fitting: Cut the sheathing panels to size, ensuring they fit snugly over the framing.
- Attaching: Secure the sheathing to the framing using screws or nails, spacing them appropriately.
- Sealing: Seal all seams and edges with caulk or tape to prevent water intrusion.
Pro Tip: Consider using a moisture barrier (e.g., Tyvek) between the sheathing and the siding to further protect against water damage. Choose sheathing materials that are rated for outdoor use.
Insulation, Wiring, and Plumbing: Adding Comfort and Functionality
With the basic structure in place, it’s time to add the elements that make your camper comfortable and functional. This includes insulation, wiring, and plumbing.
Insulation
Proper insulation is essential for regulating temperature, reducing noise, and preventing condensation. There are several types of insulation to choose from, including:
- Spray Foam: Provides excellent insulation and air sealing but can be more expensive and requires specialized equipment.
- Rigid Foam: Easy to install and provides good insulation value.
- Batt Insulation: Affordable and readily available, but requires careful installation to avoid gaps.
- Reflective Insulation: Reflects radiant heat, but its effectiveness depends on proper installation and an air gap.
Install the insulation between the framing studs, ensuring there are no gaps or voids. Seal any cracks or openings with caulk or expanding foam.
Wiring
Electrical wiring powers your appliances, lights, and outlets. It’s crucial to follow electrical codes and safety guidelines. Key steps include:
- Planning: Determine the electrical needs of your camper and plan the wiring layout.
- Running Wires: Run wires through the walls and ceiling, securing them with staples or clips.
- Installing Outlets and Switches: Install outlets, switches, and light fixtures in the desired locations.
- Connecting to Power Source: Connect the wiring to a power source, such as a shore power hookup or a generator.
Pro Tip: Hire a qualified electrician if you’re not comfortable working with electricity. Use appropriately sized wiring and circuit breakers to prevent overloading.
Plumbing
If you’re adding a bathroom or kitchen, you’ll need to install plumbing. This involves:
- Planning: Determine the location of your water tanks, sinks, shower, and toilet.
- Running Pipes: Run water supply lines and drain lines, using appropriate fittings and connections.
- Installing Fixtures: Install sinks, showers, toilets, and other fixtures.
- Testing: Test the plumbing system for leaks.
Pro Tip: Use PEX tubing for water lines, as it’s flexible, durable, and easy to install. Consider adding a water heater for hot water.
Interior Finishing and Customization: Making it Your Own
The final stage involves finishing the interior and adding the features that personalize your camper. This is where your creativity can truly shine.
Interior Finishes
Choose flooring, wall coverings, and cabinetry that match your style and preferences. Consider the following:
- Flooring: Options include vinyl, laminate, and wood. Choose a durable and water-resistant option.
- Wall Coverings: Options include paneling, paint, and wallpaper. Consider the weight and ease of installation.
- Cabinetry: Build or purchase cabinets and install them in the desired locations.
Pro Tip: Use lightweight materials to minimize weight. Consider using recycled or reclaimed materials for a sustainable touch.
Adding Features and Amenities
Equip your camper with the features and amenities that enhance your comfort and convenience. Consider:
- Bedding and Seating: Choose comfortable mattresses, seating, and cushions.
- Appliances: Install a refrigerator, stove, microwave, and other appliances.
- Lighting: Install interior and exterior lighting.
- Storage Solutions: Add shelves, drawers, and cabinets to maximize storage space.
- Entertainment Systems: Install a TV, sound system, or other entertainment options.
Pro Tip: Plan the layout carefully to maximize space and functionality. Consider incorporating smart home features for added convenience.
Safety and Regulations: Ensuring a Safe and Legal Build
Safety is paramount when building a camper. Additionally, you must comply with local regulations.
Safety Considerations
- Weight Distribution: Ensure the weight is distributed evenly to maintain stability and prevent overloading the trailer.
- Fire Safety: Install smoke detectors, carbon monoxide detectors, and a fire extinguisher.
- Ventilation: Provide adequate ventilation to prevent moisture buildup and ensure air circulation.
- Electrical Safety: Follow electrical codes and use GFCI outlets in wet areas.
- Secure Storage: Secure all items to prevent them from shifting during travel.
Regulations and Permits
Research local regulations and requirements before starting your build. This may include:
- Permits: Obtain any necessary permits for building a camper.
- Inspections: Schedule inspections to ensure compliance with building codes.
- Registration: Register your camper with the appropriate authorities.
Pro Tip: Consult with local building officials to understand the specific requirements in your area. Failure to comply with regulations can lead to fines or delays.
Maintenance and Upkeep: Preserving Your Adventure Mobile
Once your camper is complete, regular maintenance is essential to keep it in top condition and extend its lifespan.
Regular Inspections
- Trailer Frame: Inspect the frame for rust, damage, and wear.
- Wheels and Tires: Check tire pressure, tread depth, and condition.
- Brakes: Inspect the brakes and ensure they are functioning properly.
- Exterior: Inspect the exterior for leaks, damage, and wear.
- Interior: Inspect the interior for leaks, mold, and damage.
- Electrical System: Check the wiring, outlets, and appliances.
- Plumbing System: Check for leaks and ensure proper water flow.
Preventative Maintenance
- Wash and Wax: Regularly wash and wax the exterior to protect the paint and prevent corrosion.
- Sealants: Inspect and re-seal any seams, joints, and openings.
- Lubrication: Lubricate moving parts, such as hinges, locks, and axles.
- Winterization: Prepare your camper for winter storage by draining the water system and protecting it from freezing.
- Storage: Store your camper in a covered area to protect it from the elements.
Pro Tip: Keep a maintenance log to track inspections, repairs, and maintenance tasks. Regularly inspect and maintain your camper to ensure it remains a safe and enjoyable adventure mobile.
Conclusion: The Journey Begins
Building a camper on a trailer frame is a rewarding project that combines practicality, creativity, and the promise of adventure. By carefully planning, selecting the right materials, following safety guidelines, and paying attention to detail, you can transform an empty frame into a personalized haven on wheels. Remember that the process of how to build a camper on a trailer frame is just the beginning. The real adventure lies in the journeys you’ll take and the memories you’ll create. Embrace the challenge, enjoy the process, and get ready to explore the world in your custom-built camper. [See also: Campervan vs. RV: Which is Right for You?], [See also: Best Campervan Conversion Kits], [See also: Off-Grid Camping: Tips and Essentials]

