Brewing Brilliance: A Comprehensive Guide to Mastering Your Ninja Coffee Maker
The Ninja Coffee Maker has become a staple in kitchens across the globe, lauded for its versatility and ability to brew a perfect cup of coffee. But with its myriad of features and settings, mastering the Ninja Coffee Maker can seem daunting at first. This comprehensive guide provides step-by-step instructions for Ninja Coffee Maker use, ensuring you can unlock the full potential of your appliance and consistently brew coffee that rivals your favorite coffee shop. Whether you’re a seasoned coffee aficionado or a novice, this guide will equip you with the knowledge to craft exceptional coffee, every single time.
Understanding Your Ninja Coffee Maker: A Quick Overview
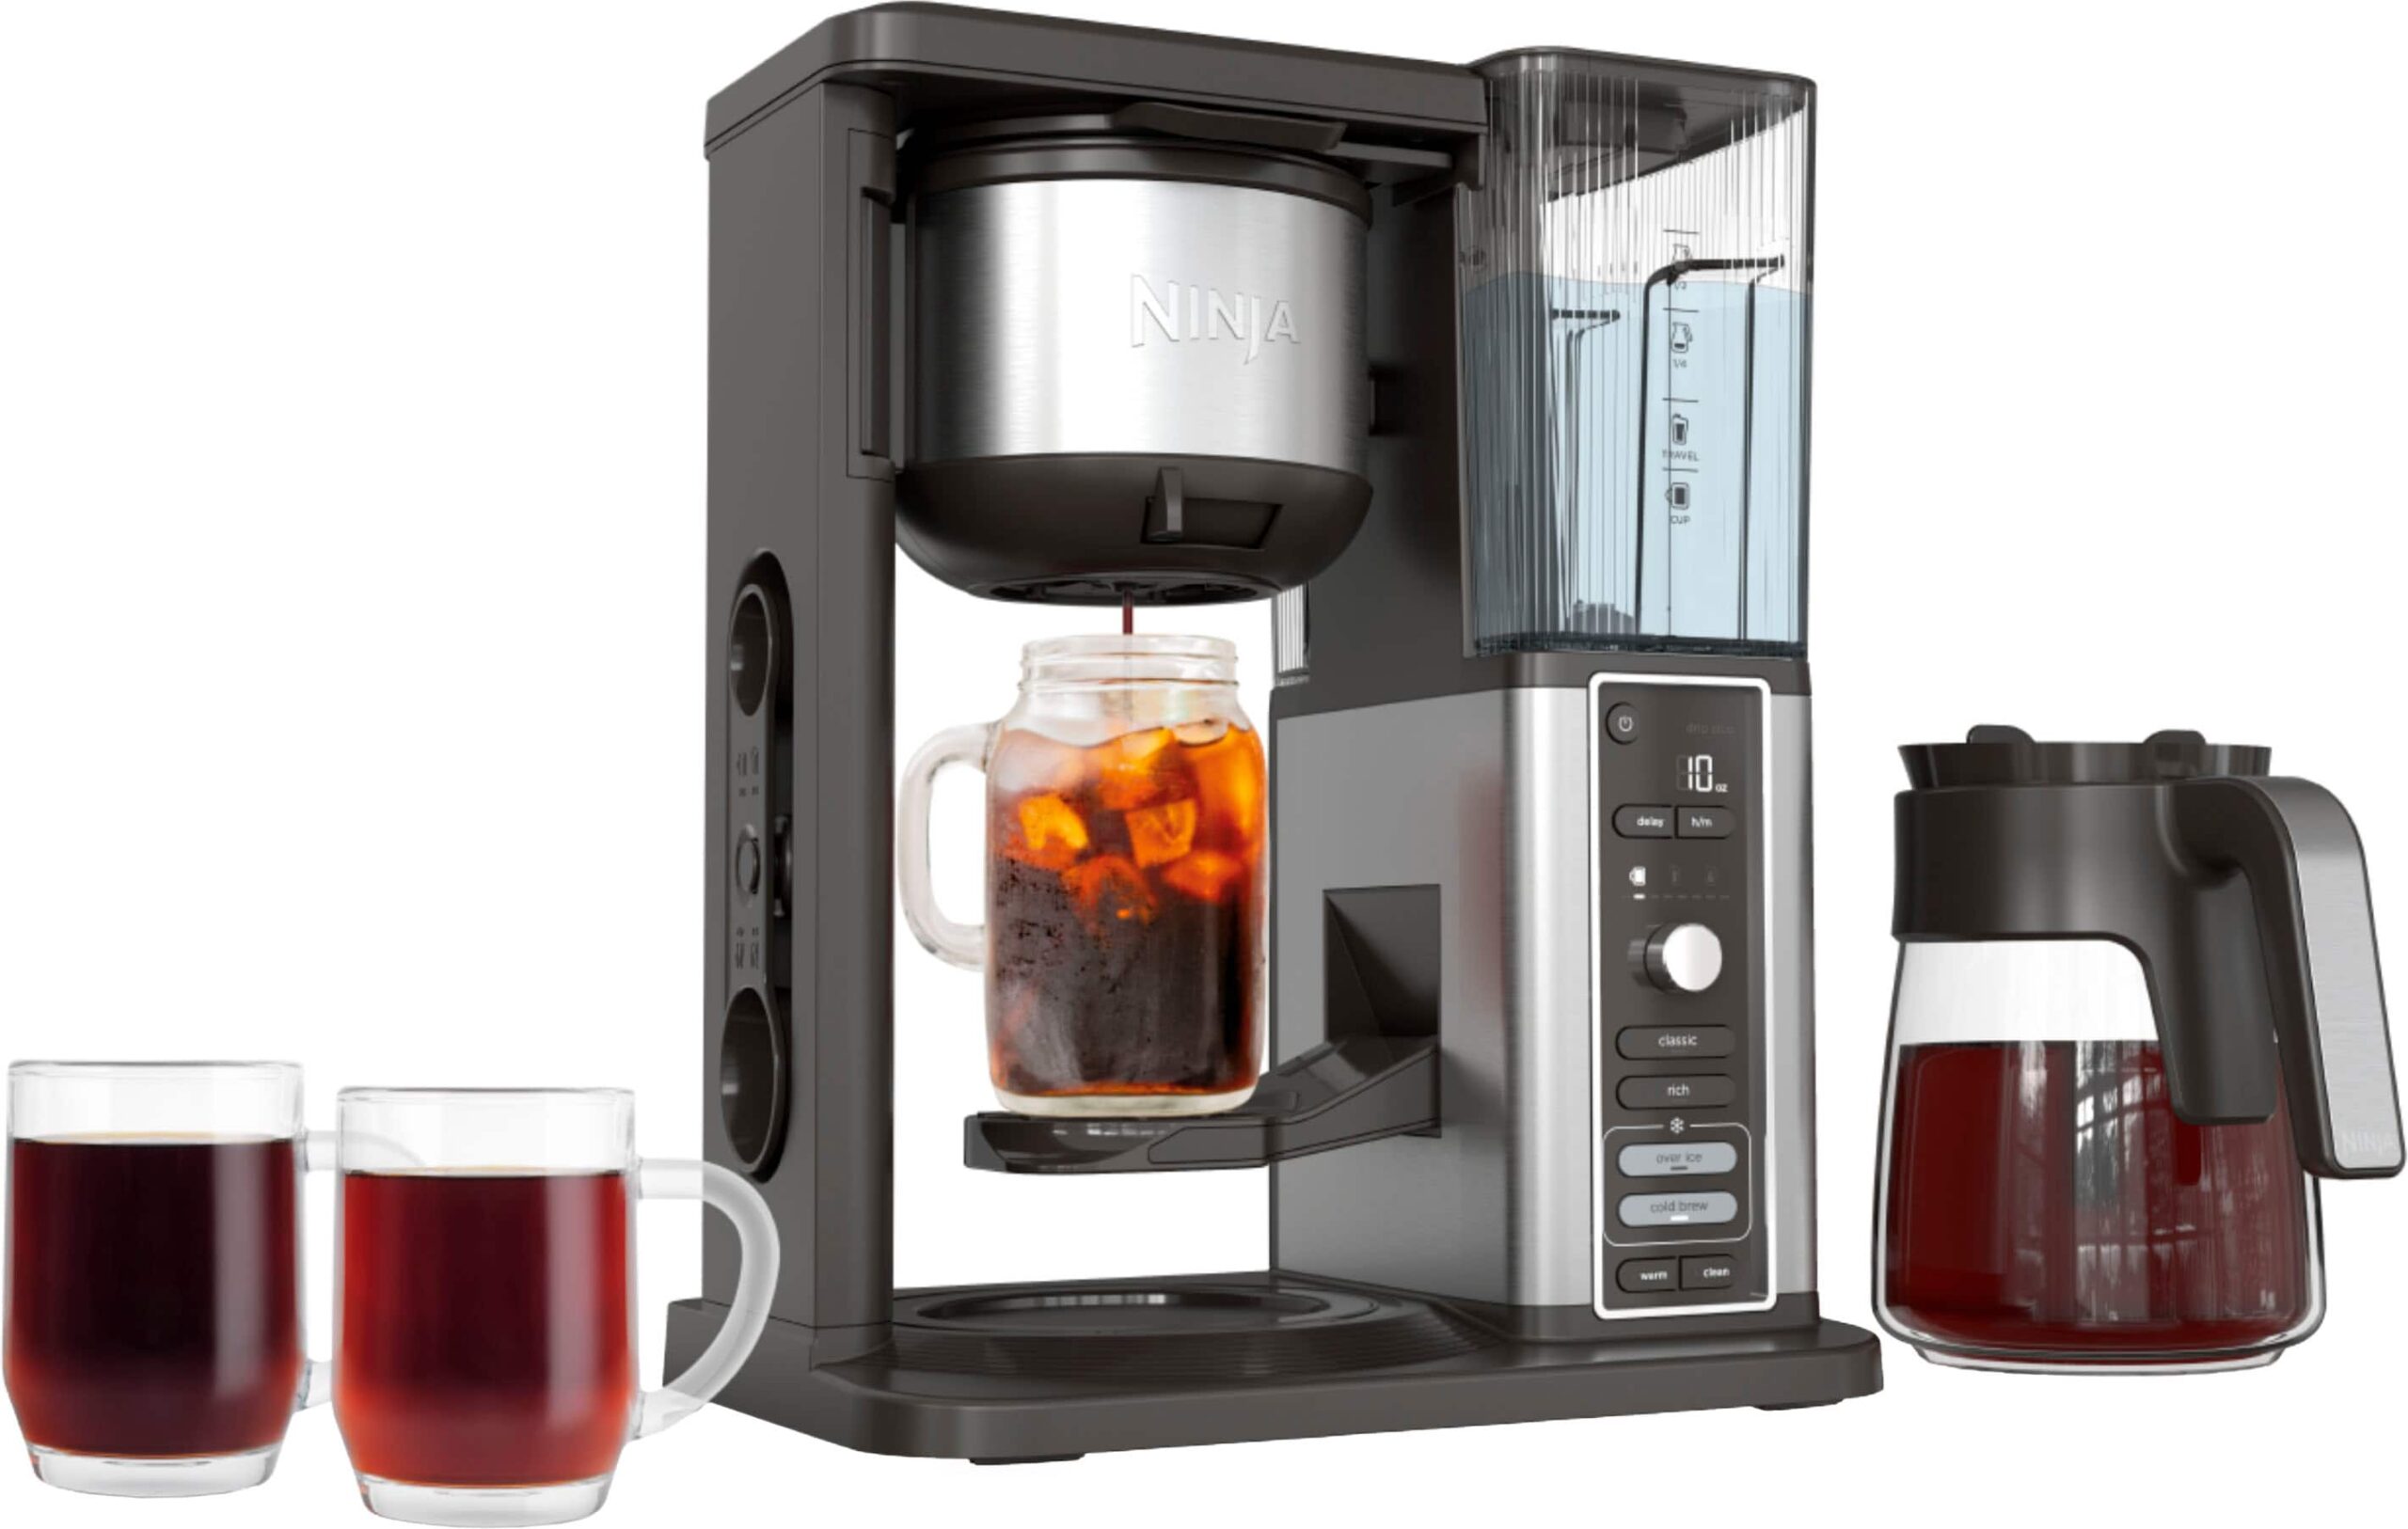
Before diving into the brewing process, it’s crucial to understand the different components and functions of your Ninja Coffee Maker. Familiarizing yourself with these elements will streamline your brewing experience and allow you to customize your coffee to your liking.
- Water Reservoir: This is where you fill the water. Most Ninja models have a removable water reservoir for easy filling and cleaning.
- Coffee Filter Basket: Located above the carafe or thermal carafe, this basket holds the paper or permanent filter and ground coffee.
- Brewing Controls: These include buttons or a touchscreen that allow you to select brew sizes, brew types (Classic, Rich, Over Ice, Specialty), and other features like delayed brewing.
- Carafe or Thermal Carafe: This container holds the brewed coffee. A glass carafe sits on a warming plate, while a thermal carafe keeps coffee hot without the use of a warming plate.
- Scoop: Many Ninja models include a coffee scoop to help measure the perfect amount of ground coffee.
Knowing these components is the first step in understanding the Ninja Coffee Maker and how to use it effectively. Let’s explore the detailed instructions for Ninja Coffee Maker use.
Step-by-Step Instructions: Brewing a Classic Pot of Coffee
Brewing a standard pot of coffee using your Ninja Coffee Maker is a straightforward process. Following these instructions for Ninja Coffee Maker will ensure a consistently delicious brew.
- Fill the Water Reservoir: Remove the water reservoir and fill it with fresh, cold water. The reservoir usually has markings indicating the number of cups. Fill it to the desired level, considering the size of your carafe.
- Add the Coffee Filter: Place a paper filter or a permanent filter into the filter basket.
- Measure and Add Ground Coffee: Use the provided scoop to measure the ground coffee. The recommended ratio is typically one level scoop (about two tablespoons) per six ounces of water. Adjust the amount of coffee to your taste preference.
- Select Your Brew Size: Choose the desired brew size using the controls on your Ninja Coffee Maker. Options often include a full carafe, half carafe, or a single cup.
- Select Your Brew Type: Choose the “Classic” brew type for a standard cup of coffee. Other options, such as “Rich” or “Over Ice,” are available depending on your model.
- Start Brewing: Press the “Brew” button to start the brewing process. The coffee maker will heat the water and begin brewing.
- Enjoy Your Coffee: Once the brewing cycle is complete, carefully pour the coffee into your mug and enjoy!
These instructions for Ninja Coffee Maker are for a standard brew. Let’s explore the features that make it exceptional.
Navigating Brew Types and Special Features
The Ninja Coffee Maker offers more than just a standard brew. Understanding the different brew types and special features allows you to customize your coffee experience.
Rich Brew
The “Rich” brew setting provides a bolder, more intense flavor. This is ideal for those who prefer a stronger cup of coffee or for use with milk and cream.
Over Ice Brew
The “Over Ice” setting is designed to brew coffee directly over ice, resulting in a refreshing iced coffee. This setting typically brews a stronger coffee to account for the dilution from the ice.
Specialty Brew
Some Ninja Coffee Maker models have a “Specialty” brew setting, which is designed to create a concentrated coffee shot, perfect for making lattes and cappuccinos. This concentrated brew provides a strong coffee base, similar to an espresso shot.
Delayed Brewing
Many Ninja Coffee Maker models offer a delayed brewing feature, allowing you to program your coffee maker to start brewing at a specific time. This is a convenient feature for waking up to freshly brewed coffee.
Cleaning and Maintenance: Keeping Your Ninja Coffee Maker in Top Shape
Regular cleaning and maintenance are essential for maintaining the performance and longevity of your Ninja Coffee Maker. Following these instructions for Ninja Coffee Maker regarding cleaning will ensure your coffee always tastes its best.
- Daily Cleaning: After each use, discard the used coffee grounds and rinse the filter basket. Wash the carafe or thermal carafe with warm, soapy water.
- Weekly Cleaning: Clean the water reservoir thoroughly with warm, soapy water. Rinse all parts well.
- Descaling: Descaling removes mineral buildup that can affect the taste and performance of your coffee maker. Descale your Ninja Coffee Maker every 1-3 months, depending on your water hardness. Use a descaling solution specifically designed for coffee makers or a mixture of equal parts water and white vinegar. Follow the descaling instructions provided in your Ninja Coffee Maker manual.
Proper cleaning ensures the Ninja Coffee Maker operates efficiently.
Troubleshooting Common Issues
Even with proper use and maintenance, you might occasionally encounter issues with your Ninja Coffee Maker. Here are some common problems and how to address them.
- Coffee Brewing Slowly or Not at All: This could be due to mineral buildup. Descale your coffee maker.
- Coffee Tasting Bitter: This could be due to using too much coffee, using stale coffee grounds, or improper cleaning. Adjust the amount of coffee, use fresh grounds, and clean your coffee maker regularly.
- Water Leaking: Check the water reservoir and ensure it is properly seated. Inspect the carafe for cracks.
Consult your Ninja Coffee Maker manual for additional troubleshooting tips.
Maximizing Your Coffee Experience: Tips and Tricks
Beyond the basic instructions for Ninja Coffee Maker, here are some tips and tricks to elevate your coffee experience.
- Use Fresh, High-Quality Coffee Beans: The quality of your coffee beans significantly impacts the taste of your coffee. Use freshly roasted, whole-bean coffee and grind it just before brewing for optimal flavor.
- Experiment with Grind Size: The grind size affects the extraction. Experiment with different grind sizes to find the perfect balance for your coffee.
- Adjust the Coffee-to-Water Ratio: Adjust the amount of coffee you use to achieve your desired strength and flavor profile.
- Preheat Your Carafe: Before brewing, rinse your carafe with hot water to preheat it. This will help keep your coffee warmer for longer.
By incorporating these tips, you can consistently brew exceptional coffee using your Ninja Coffee Maker.
Conclusion: Brewing the Perfect Cup with Your Ninja Coffee Maker
Mastering your Ninja Coffee Maker is a rewarding journey. By following these instructions for Ninja Coffee Maker and understanding its features, you can consistently brew delicious coffee tailored to your preferences. From the basics of brewing a classic pot to the nuances of specialty brews, your Ninja Coffee Maker offers a world of possibilities. Embrace the learning process, experiment with different settings, and enjoy the perfect cup of coffee, brewed just the way you like it. The Ninja Coffee Maker is an excellent appliance.
Now that you have learned the instructions for Ninja Coffee Maker, you are ready to start your coffee journey.
[See also: How to Choose the Right Coffee Beans, The Ultimate Guide to Coffee Grinders, Iced Coffee Recipes Using Your Coffee Maker]

